The following tutorial outlines how to create a layer mask from a ‘blend if ‘ effect. If enough interest exists, a video tutorial could be arranged!
What am I using this technique for?
- Exposure blending
- Selective adjustments in areas of different luminosity /brightness
What are current alternatives? (pre-requisite knowledge)
- Luminosity masks : Google search ‘Tony Kuyper luminosity masks’
- Blend if sliders: Google search ‘Mark Metternich blend if’
- Use of layer masks.
How applicable is this technique to you?
- Limited applicability /Situational use only.
- Likely for advanced users of photoshop who have encountered limitations with luminosity masks and blend if in isolation
What is the problem?
Luminosity masks are generated from ‘overlapping’ areas within the channels palette hence brightness and darkness masks are relatively fixed. Various midtone masks can be generated based on overlapping , intersections and exclusions of various bright and dark masks. These likewise are only customisable after the mask has been created. The benefit of using luminosity masks is that once a mask is created, it can be subjected to all other mask refinement techniques.
Blend if sliders are excellent in that their effect can be viewed in real time. The other advantage is that they can target extremely specific and customisable areas of brightness. For instance, if I wanted to target midtones with luminance values of 100-130 alone, this can be done easily ; I do not have this level of customisation with luminosity masks. It is easy to remove the effect of a blend if easily with a layer mask though ‘reincluding’ areas excluded by the blend if effect requires a work around. The other limitation of the blend-if I have found , is that once I have achieved the effect in a target layer that I desire, I have never had a saved layer mask for future use. For instance, if I wanted to retarget the exact same areas with other adjustment layers or blurring /sharpening techniques/mask refinement it was always difficult to do with the flexibility of using layer masks.
After some reading , I found a way to create a layer mask (which can then be saved in the channels palette for future use) from the effects of a blend if layer.
Here is the way I have found to achieve this :
- The layer upon which you are utilising the ‘blend if’ effect has to be one with pixel data (ie. not an adjustment layer)
- Adjust the blend if sliders as you normally would as if you were blending or achieving selective adjustment of highlights/midtones/shadows
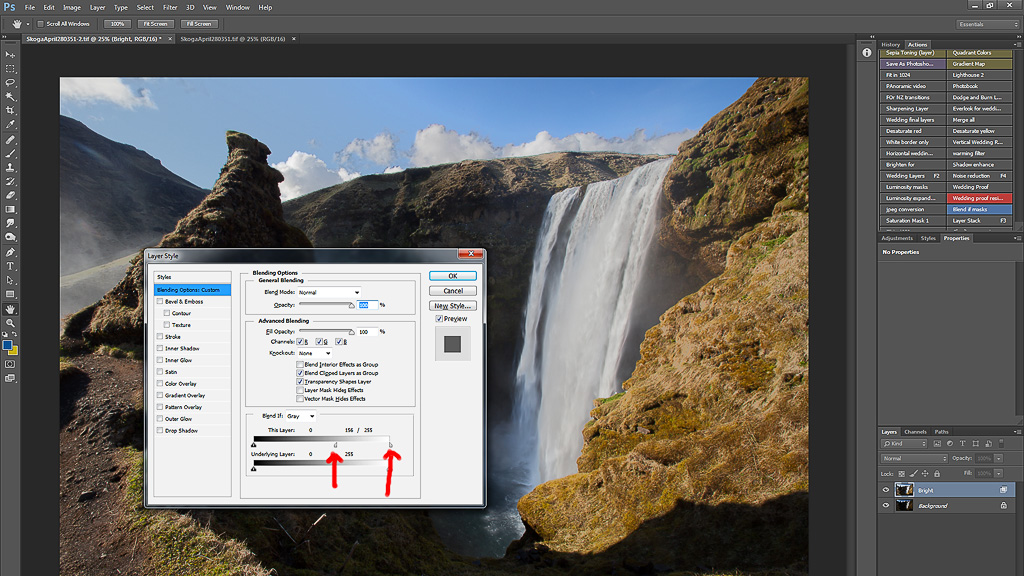
Use the blend if sliders as per normal - With this layer selected, press Ctrl-G to create a group
- With this group selected, press Ctrl-E to flatten this group into a transparency (turn off the background layer to see what you have created)
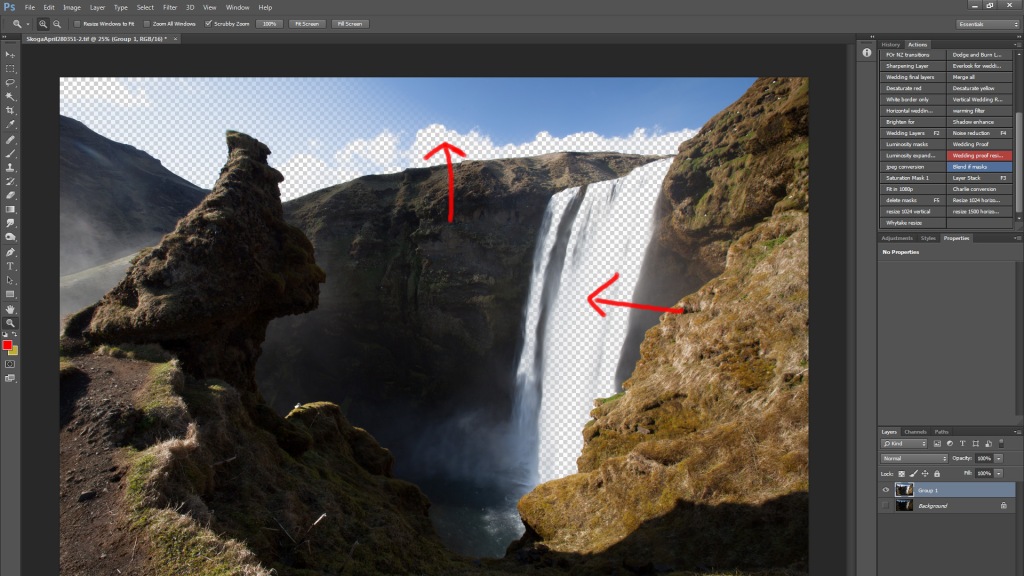
After flattening, you should transparent areas where the blend if effect has excluded the brightness values you chose - You should now see a layer created with only parts of the image selected by your ‘blend if’ effect
- Ctrl-left click that layer to select its contents
- Switch to the channels tab and save the current selection as a new channel and there you have it, the blend if effect in the form of a layer mask.
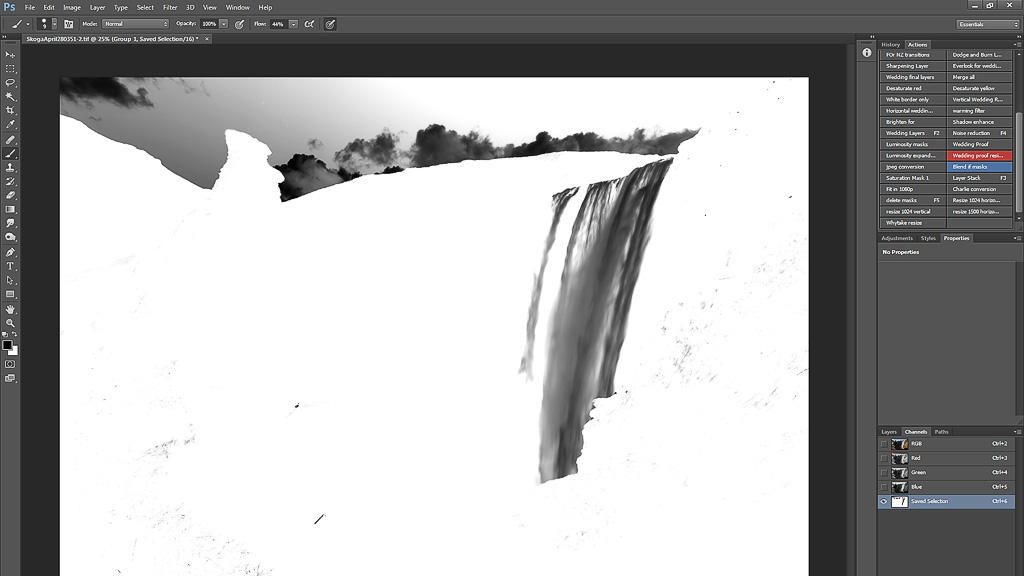
This is the mask you will now have for future use with your ‘exact’ prespecified blend if values


** Alternative pathway suggested by Erin Babnik (which is better and preserves your original blend if sliders) **
- Follow step 1 and 2
- At step 3, convert the blend-if layer into a smart object
- Follow from step 6 onward
Potentially, this could be a very powerful way to develop very specific luminosity masks (for instance masks could be generated for ANY brightness value with any increment) but for the time being, manual adjustment of luminosity masks is still getting the job done 99% of the time for me. It is however good to know that when blend if is working better for me in a certain situation, I can utilise the benefit of having this in the form of a layer mask.
Hope that was helpful and remember, these techniques are not mutually exclusive and often, combining will help you achieve what you need.

Might have to give that a good. Nice one Dylan.
Let me know how it goes! Blend if works well for me sometimes but the more advanced tricks Mark Metternich goes into are a good read
Awesome Dylan! Can’t wait to put it into use!
hope it works! I made myself an alternate luminosity mask palette with an action for values 0-30 right up to 255 – will be testing it out!