Social media has been a very useful platform for us in terms of allowing our work to be seen. As hobbyist photographers with full time professions, we have needed to find ways to maximise our exposure with the least time intensive method possible! Having good or even great images is unfortunately only one part of the matrix involved. Over the years, we have gathered quite a following on various platforms and we have learned some valuable lessons regarding social media as a general entity, as well as on specific platforms. Here are some of our tips.
Goals: It’s important to know why exactly you are investing time into social media. Is it to simply share your work? Are you after validation from your photographic peers or the general public? Are you planning on creating a marketing strategy that will gain you income? Are you hoping to ‘take over’ a market by becoming an ‘influencer’ ? Or is it largely just for fun? Exploring your motivations regarding your social media presence will not only help you determine how much energy to expend but will also help you avoid disappointment and resent. The most common source of disappointment I see stems from an perceived lack of validation based on very few ‘likes’ or ‘faves’ of images. Whatever it is, time needs to be invested in order to meet your goals. This leads on to the next point.
Investing little time and images into an engine (like viewbug for us) should mean that you expect little in return. Social media presence takes time and work!
Personal and public value: I think it is very important to separate how we feel about ourselves as artists and how the world views us through a social media platform. The popularity of an image often does not correlate with personal value. Your profile popularity is certainly not a reflection of self worth. It is very easy to become bitter with the whole social media ‘circus’ when one starts to equate popularity (or lack of) with self merit.
One of my favourite images but not particularly liked on social media. This doesn’t devalue the image, it just means I won’t bank on it to draw the crowds!
Content: There’s no substitute for having appropriate content that is directed at your target audience. Note that I did not use the word ‘good‘ to describe content as this is highly subjective. Seemingly, the largest audience on social media appears to be those looking for images that represent lifestyle and escapism. In the landscape genre, this includes a combination of selfies, foot-selfies, pork pie hat selfies, fronts of canoes , acid washed landscapes prepared with VSCO presets. Did you internally sneer at the preceding list ? If so, try to stay true to your own ideals and post content that you are proud of and reconsider your goals. How much are you willing to adjust content in order to achieve that goal ?
Of these ‘editors choice’ images on 500px, Marc Adamus image is the only one I would aspire to. I’m personally not willing to VSCO or pork pie hat my images. Are you?
Visibility: Do everything within your power and moral code to ensure your images have the best chance of being seen (if you have the energy). I try to tag my images with as many appropriate tags as I’m allowed. On instagram I use hashtags for high visibility sites. On flickr and 500px I try to geotag the images on the mapping platform. I don’t tend to start doing a mass commenting spree but try to keep up with those I follow and am genuinely inspired by (though these days, having just the time to post is a struggle).
Stay positive. Social media engines are on the whole, not critique forums. Join a critique forum if you want to deliver or receive meaningful criticism about your work. I tend to go by the old adage ‘If you haven’t got anything nice to say, don’t say it at all!’. Most people log on to social media to be inspired, to have fun and to feel warm and fuzzy about their own work and their peers. The competitive negativity created from ‘flame wars’ incited by snarky comments or backhanded compliments always ends with both parties appearing worse off in some way. The petty one-upmanship that is subsequently portrayed then reflects poorly on the artists within that genre and defeats one of the major purposes of social media ; community.
A typical comment thread on images on instagram. They don’t mean anything per se and adding snarky comments about what you don’t like stands out like a sore thumb . It also makes you look the fool!
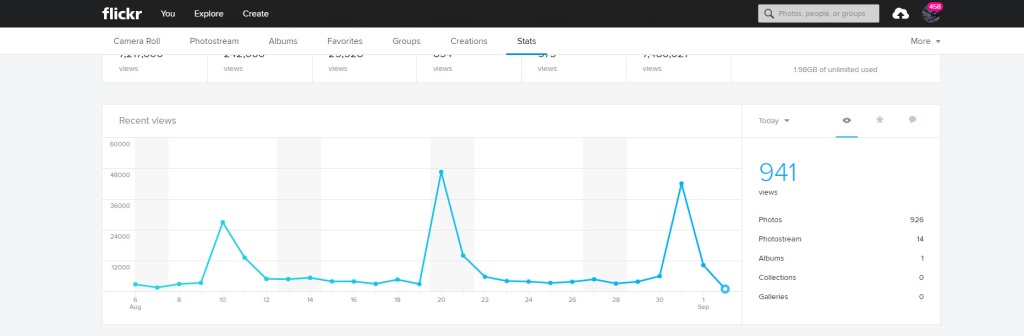
Research your engine. If possible, try to find out a little about who is looking at your work and where they come from. Just a simple change in timing of your posts could have a significant impact on the overall exposure. One may call it ‘gaming the system’ but once again , how willing you are to play games with social media reflects on point 1. One particularly striking example of this is flickr’s explore algorithm. Once your images make it on that page, it receives massive exposure but the engine only allows a user to be on explore one every 9-10 days. Hence, that’s when I post the content that I want to be seen along with promotions for new items on our website.
I can confirm rumours that flickr lets you into its explore algorithm every 9-10 days!! Not the spikes in views of our page.
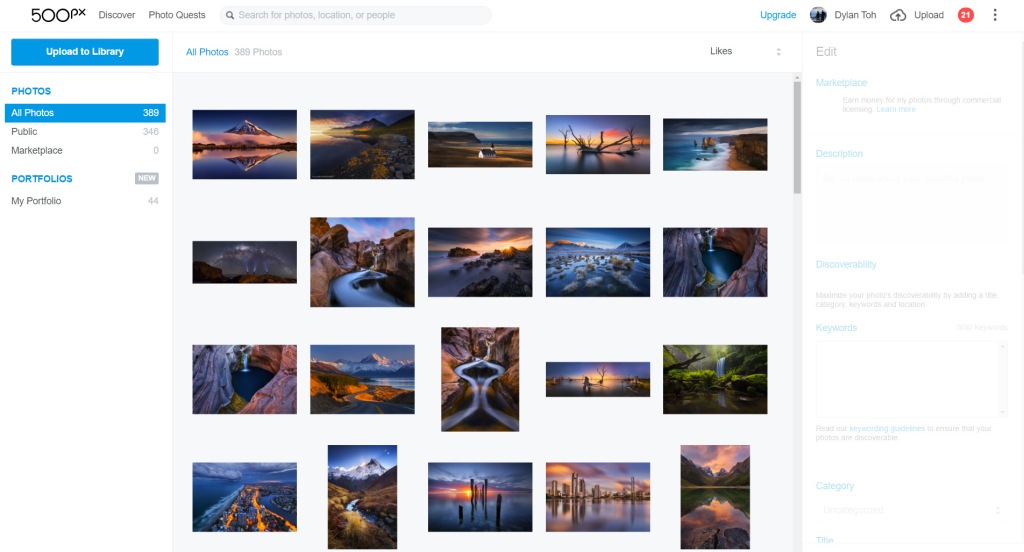
Know your strengths: For some reason or another, one social media engine may well be much kinder to your images. This may come from being a recommended user when people log on, or it may be the engine which you have invested the most time in. Most of the time it isn’t through sheer luck. Recently on 500px for instance, we made it onto the recommended user list which ballooned the viewership of all of our images. Because there are potentially 88k people who could see our work before it even becomes popular, it means that our images make it quite quickly on to the popular section which is then viewed by the general public. I know there are those out there whose thought processes include ‘Oh that photographer’s images are crap but they just get high scores because of his/her follower count’. It’s that kind of thinking that can again lead to unnecessary bitterness and a focus on the work other people are producing instead of your own. I’m making hay while the sun shines for our account by posting regularly to take advantage !
These are our most ‘liked’ images on 500px. The first three also happen to be personal favourites. the rest are nearly all from this year . That doesn’t fool me into thinking I’ve been an awesome photographer this year. This just means that this year, we’ve boomed on 500px. Nothing more, nothing less.
And now irrespective of any debate about social media value, image manipulation, comp stomping, post processing trends and other such flammable topics, this is my favourite recent image taken at Mannum Falls. Hope you enjoyed the read! Now post away with carefree joy and meet those social media goals of yours 🙂
The following are some of the practical aspects of choosing and using Neutral Density (ND) filters.
What are ND filters?
Dark glass (or resin) which allow a photographer to lengthen the shutter speed.
Screw on (circular) vs Square (slot in) – see below in accessories
Light blocking terminology:
Stops blocked
1 stop
2 stop
3 stop
10 stop
Exponential version
ND2
ND4
ND8
ND1024
0.3 version
ND0.3
ND0.6
ND0.9
ND3.0
Shutter speeds
No filter = 1 sec
2sec
4sec
8sec
1024sec
Accessory checklist:
Tripod: must be firm and steady
Cable release : essential to achieve exposures of greater than 30 seconds. Some firmware changes such as ‘magic lantern’ and some camera applications (such as for the sony A7r series) offer an alternative to a cable release but I prefer the former.
Filter holder and square filter set up. Allows 2(Lee default) to 3(Nisi default) filters to be stacked in front of the camera. Lee requires an additional slot for a 105mm CPL, Nisi system has a CPL attached to the default sized adaptor ring itself. Insert ND filter on the closest filter slot with padding firm against edges of the holder to prevent light leak.
Screw on filters need no filter kit. These minimise light leak but are unable to ‘stack’ with other filters. Can be used with CPL but could lead to vignetting.
Optical view finder cover (to prevent more light leak). Can be on the camera strap itself (Canon) or can be anything invented ! eg. Blue-tac, duct tape.
Density recommendations (approximate)
2-3 stop : for waterfalls, seascapes in bright light : target shutter 0.5-5 seconds
1 second foreground using a 3 stop ND filter 3 minute sky using a 10 stop ND filter
6 stop : for fast moving clouds, seascapes in low light: target shutter 5-60-seconds
6 stop ND filter for 1 minute exposure at dawn , fast moving cloud
10 stop: for elimination of water textures, slowish clouds: target shutter 1-5 minutes
10 minute exposure using a 15 stop ND filter after dawn with slow moving cloud
15 stop: same target as 10 stop except in brighter conditions: target shutter 1-20 minutes
Vari-ND: limited by screw on setup and some brands have bad cross polarisation artefact.
Camera setup :
Turn off long exposure noise reduction. (noise reduce in post processing)
Turn off autofocus . Leaving it on may result in the camera hunting in the dark for and lead to an out of focus image
Keep ISO low. This is within camera limitations. I like to keep ISO <400. (if going much higher, could you just achieve the same results with camera settings alone or less dense ND filter?)
Activate expanded ISO (eg. ISO50 for Canon users)
Adjust aperture according to given scene. At your lens’s sweet spot at f8, the exposure may not be long enough after minimising ISO and placing your most dense ND filter.
Shot at F11 with fading light. I worked for a 2 minute exposure after experimenting prior which meant using iso200 with a 3 stop ND filter.
Composition tips:
Usual rules of composition apply
ND filters allow simplification of ‘chaotic’ elements eg random water motion, unattractive clouds. Use these to emphasise areas of detail within your image
Compose without ND filter on to achieve your desired composition and to find your focal point manually.
Don’t let the ND filter dictate the shutter speed. Use ND filters to achieve the shutter speed you desire for the scene.
Short exposure version of a scene (which allows many more options in changing light both with regard to shutter speed and compositions – this is a vertorama)
Biting the bullet and going for a long exposure can be hit and miss. More hits arrive with more practice!
Calculating exposures
For every stop of light blocked, exposure duration doubles. (See first table)
Use apps if you don’t mind bringing devices into the field
This shot at Mannum Falls was taken with 10 stop ND filter – viewing through the viewfinder would be pitch black, hence composition using live view is a good work around.
How long do I want?
See the above section in ‘density recommendations’
Start with that filter and adjust ISO/aperture accordingly to achieve the exact shutter that you need for the scene.
During your test exposures without the ND filters, take some dedicated shots with shorter shutter. You might like them more!
Varying appearances of water and sky according to shutter speed and density of ND filter used. All images used the same settings in LR.
The 10 stop version was the pick of the bunch for me, but if I change my mind, I could use any of the previous images.
With or without filters?
Think about combining filters to achieve a single exposure result
Using an additional GND for the sky
Avoid stacking ND filters as the filter in the 2nd slot will almost certainly let light leak in
Think about taking an image for dark areas of the scene without the ND filter on as the ND filter will require a very long exposure for deeply shadowed areas. Blend them in post processing.
This 10 stop ND filter shot has some elements of shadowed areas blended from a shot with the ND filter. This was done in the field to save the time required to achieve a proper exposure with the 10 stop ND on.
Ultimately, repetition leads to reflexes and if the routine is a reflex, more thought can go into the art of achieving a result instead of the mathematical and technical processes of using filters. Enjoy!
Disclosure: I am a Nisi brand ambassador who tries to write neutrally and objectively. If you are interested in purchasing filters after reading this article, feel free to email us dm@everlookphotography and I will be able to give a discount code for Australian customers.